> For the complete documentation index, see [llms.txt](https://developers.neowit.io/llms.txt). Markdown versions of documentation pages are available by appending `.md` to page URLs; this page is available as [Markdown](https://developers.neowit.io/service-accounts/creating-service-accounts.md).
# Creating service accounts
A quick guide on how to create a Service Account for our REST API.
## Overview
We will here create a new Service Account using either the web application or our REST API.
## Prerequisites
In order to create the initial service account, the logged in user needs to have a role of Admin.
## Create using app
The first service account needs to be created using our App. Whereas subsequent accounts may be created using the REST API.
1. Navigate to [Service account settings](https://app.neowit.io/settings/serviceAccounts)
2. Click Add
3. Give the account a meaningful name and decide whether you want to enable [Basic Auth](/rest-api/authentication/basic-auth.md)
4. Click Save
5. Add 1 or more service account keys that may be used for [Authentication](/rest-api/authentication.md)
6. Choose the key algorithm. Use `RS256` for new integrations; use `HS256` only for legacy shared-secret integrations.
7. Optionally set a key expiration date.
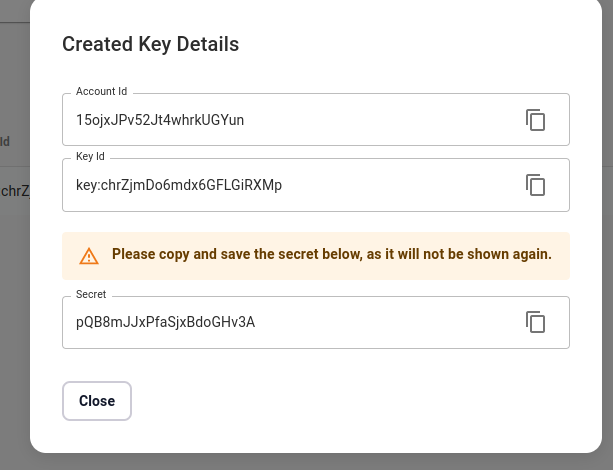
8. Copy the details.
{% hint style="info" %}
For `RS256` keys, store the private key securely; Neowit stores only the public key. For `HS256` keys, the shown secret will not be shown again.
{% endhint %}
{% hint style="danger" %}
Make sure private keys and shared secrets are safely stored. Delete the key if you think it has been compromised in any way.
{% endhint %}
{% hint style="info" %}
If a key has an expiration date, it cannot be used after that date. Create and deploy a replacement key before the current key expires.
{% endhint %}
Dialog showing the created key information
## Create using REST API
Service accounts may be created, and keys may be rotated or deleted using the REST API shown below. When creating a key through the API, `expiresAt` is an optional Unix timestamp in seconds. See our [API reference](/rest-api/api-reference.md) for more operations.
{% openapi src="" path="/service-account/v1/service-account" method="post" %}
{% endopenapi %}
{% openapi src="" path="/service-account/v1/service-account/{id}" method="delete" %}
{% endopenapi %}
{% openapi src="" path="/service-account/v1/service-account/{id}/key" method="post" %}
{% endopenapi %}
{% openapi src="" path="/service-account/v1/service-account/{id}/key/{key-id}" method="delete" %}
{% endopenapi %}